- Video
- Doctor POV: Open Rhinoplasty (Part 5)
{{ showTranscript ? 'HIDE' : 'SHOW' }} TRANSCRIPT
What I'm going to show you here is what's called a continuous intranasalosteotomy. This is also known as a micro osteotomy and what you see is the
lateral osteotomy in a high to low fashion. Now the important thing to see
is that my assistant is using a hammer to do a tap tap, tap tap, tap tap,
hit on my osteotome which I'm' holding with my right hand. As I'm precisely
guiding it on the right side, the left hand is actually feeling the tip of
the osteotome and where it's going. You can see just how quickly and how
precisely the bone was cut and the left nasal bone was narrowed. That's how
simple it is.
On the other side the same thing again. My right hand is holding the
osteotome, my assistant is tapping when I asked him too and my left hand is
feeling and guiding it. Again this is called a micro osteotomy because it's
a small osteotome. It's going to not tear through a lot of tissue. It's
going to cut the bone precisely the way I want it too, and it's going to
narrow the nasal bones exactly as I want it too.
That's how quick it is, that's how simple it is, when you do this all the
time. Now a lot of surgeons actually avoid doing osteotomy's. A lot of
patient's talk their surgeons out of doing osteotomies and then you end up
with things like open mute deformities, various other deformities.
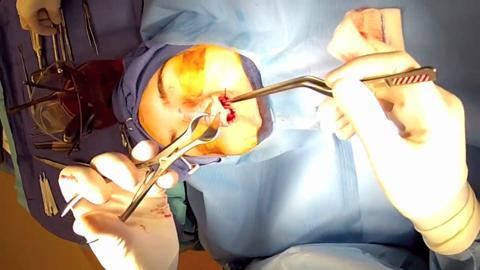
Now what I'm removing are two small packing's that I had during the
surgery. These get removed because I don't want blood dripping down the
back of their throat and they come out. I do not routinely pack the nose
after surgery and that makes it much more comfortable for my patients.
What I'm going to show you now in my right hand is the small micro-
osteotome that I have and the left hand an osteotome that a lot of surgeons
typically use and you can see the smaller osteotome creates less damage and
trauma. Now what you notice is I'm going to take my rasp or files back
because when you do osteotomies a lot of times small edges of the bone
raise up and you just have to simply rasp it down very meticulously very
carefully to recreate a nice dorsal or bridge profile.
This rasping is the same way that it was done in video number four. Where I
go from courser rasp to finer ones but here since I've pretty much brought
the bone down to the level that I wanted too, I'm starting with the rasp
that are not as course as before.
You see fine filling and then what I'm going to show you is that I'm going
to flip my rasp over and remove any small remnants of bone or cartilage
that may be left behind because if you don't remove these they can leave
little small nod gels and you can see that. Their out and I don't have to
worry about then. Throughout the procedure I will do this and also irrigate
the nose. Now you can see how nice and narrow and straight the nose is.
Doctor POV: Open Rhinoplasty (Part 5)
In order to narrow the nasal bones, Dr. Shervin Naderi walks us through the process of gently breaking it and allowing the shape to be altered. He then internally files the dorsal bone to eliminate the humped silhouette.